FAQs - Common implementation questions
Collection of frequently asked questions on the usage of our APIs. This is based on past conversations and issues we were able to help with our implementations.
Cannot read properties of undefined
If you encounter the following error:
Uncaught (in Promise) TypeError: Cannot read properties of undefined (reading 'General')
	at h.instrument (swym-ext-shopify.js?...om&v=3.95.0:261:357)
	at f.<computed> [as fetch] (swym-ext-shopify.js?....com&v=3.95.0:31:40)
	at eval (Wishlist.svelte:378:19)
This is mostly caused due to an incomplete implementation of our JS APIs. Here are some examples of improper API usage that could potentially throw this error:
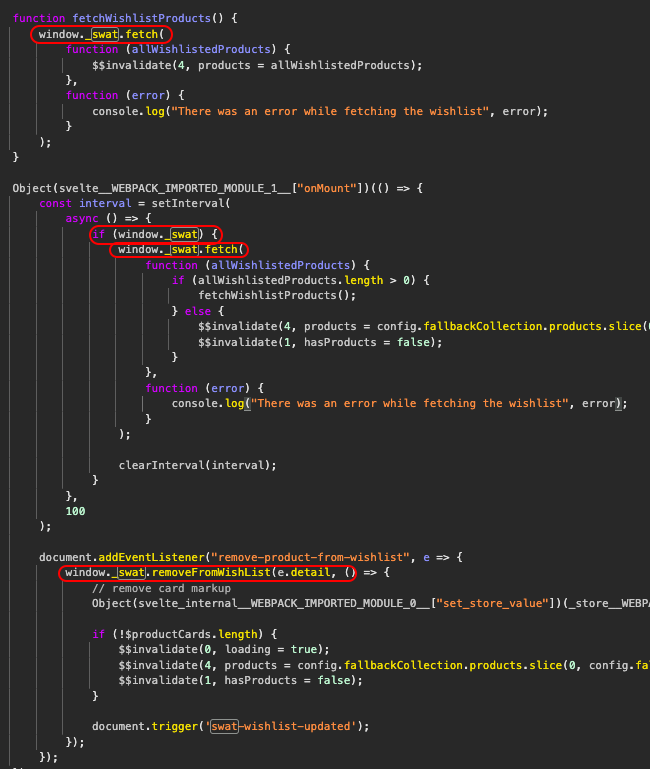
Using window._swat to make the API calls might lead to timing issues where not all components of the Swym Storefront JS client have been fully loaded by the time the calls are made. This could explain why the xxxx.General being undefined when your code executes..
To avoid this, the best way is to use our JS APIs in a complete implementation by wrapping every extension with our fully loaded callback function. This ensures that your custom functions are queued in the window.SwymCallbacks array and executed after the Swym app has fully loaded. For detailed guidance on how to implement this, please refer to our help article on using the SwymCallback function.
// create a self-executing anonymous function to avoid leaking variables into the top level scope of window
(function() {
  // Executed after Swym Storefront JS Client has loaded all necessary resources.
  function onSwymLoadCallback(swat) {
    // Please make all Swym-related API calls inside this function.
    // You can use the swat argument within this scope.
  }
  if (!window.SwymCallbacks) {
    window.SwymCallbacks = [];
  }
  window.SwymCallbacks.push(onSwymLoadCallback);
})();
Queries regarding outdated API usage
Q1: Why am I receiving API errors?
As of May 24, 2024, the majority of the APIs listed in our older documentation (Swym API Reference ) are outdated. We strongly encourage all developers to transition to our latest API documentation available at Swym Developer Documentation, where the implementation of most API calls is explained in a more comprehensive manner.
Q2: What does outdated mean?
Outdated APIs are those that are no longer supported and will eventually be removed. Using outdated APIs can result in unexpected behaviour and implementation errors.
Q3: Are all the APIs in the old documentation outdated?
Not all APIs in the older documentation are outdated. However, the implementation of the majority of API calls has been explained in a more comprehensive manner in our latest developer documentation. For the best experience and support, we recommend using the latest documentation.
Q4: How can I migrate to the latest APIs?
Please refer to our latest API documentation at Swym Developer Documentation. This documentation provides comprehensive guides, examples, and best practices for implementing our current APIs.
Q5: What if I have already implemented APIs from the older documentation?
If you have already implemented APIs from our older documentation and need assistance transitioning to the latest APIs, please reach out to us at [email protected]. Our support team is available to help you identify the updated API calls and assist with the migration process.
Q6: What if I have questions during the migration process?
For any questions or concerns during the migration process, please contact our support team at [email protected]. We are here to help ensure a smooth transition to the latest API standards.
Social Count implementation on multiple products at once
Issue: Merchants face an issue when implementing the Fetch Wishlist Social Count API on collection pages. The API call is dependent only on the Product ID and not the Variant ID. Therefore, if there are multiple products with the same Product ID but different Variant IDs, the button will appear only once.
Solution: The script should be modified to handle multiple instances of the same Product ID correctly.
Step-by-Step Guide for Implementation Reference:
HTML Button Setup:
Add an HTML span with a similar structure to your collection page. This implementation works only when the EPI button is used. For more information on implementing this button, please refer to this article. For code readability, please place this span along with the EPI button enclosed within a
<span class="swym-collections-social-count swym-hide-social-count" onclick="event.target.parentElement.querySelector('#swym-collections').click()" data-product-id="{{ <product.id OR card_product.id based on what is used in your code> }}"></span>
JavaScript Code Implementation:
Include this script with a similar structure in your theme files. This script will handle fetching and displaying the social count for each product tile.
<script defer>
  (function() {
    function swymCallbackFn(swat) {
      // Step 1: Collect all product IDs from the buttons
      const productIdArray = [];
			const allSwymCollectionsButtons = document.querySelectorAll('.swym-collections-social-count');
			allSwymCollectionsButtons.forEach((button) => {
  		const productId = button.getAttribute('data-product-id');
  		if (productId) { // Only push if productId is not an empty string
    		productIdArray.push(productId);
  		}
			});
      // Step 2: Function to fetch social count for a given product ID
      function fetchSocialCount(productId) {
        return new Promise((resolve, reject) => {
          swat.wishlist.getSocialCount(
            { empi: productId },
            (data) => resolve({ productId, count: data }),
            (error) => reject({ productId, error })
          );
        });
      }
      // Step 3: Generate an array of promises for fetching social counts
      function generateFetchBody() {
        return productIdArray.map((productId) => fetchSocialCount(productId));
      }
      // Step 4: Execute all fetch requests simultaneously and update the buttons
      Promise.all(generateFetchBody())
        .then((results) => {
          console.log(results, 'results');
          results.forEach((result) => {
            // Find all buttons with the same product ID and update their counts
            const buttons = document.querySelectorAll(`.swym-collections-social-count[data-product-id="${result.productId}"]`);
            buttons.forEach((button) => {
              result.count.data.count ? (button.textContent = result.count.data.count) : (button.textContent = '');
              button.classList.remove('swym-hide-social-count');
            });
            console.log(result, 'result');
          });
        })
        .catch((error) => {
          console.error('Error fetching social counts:', error);
        });
      // Step 5: Update the social count when a product is added to the wishlist
      swat.evtLayer.addEventListener(swat.JSEvents.addedToWishlist, function(product) {
        let productId = product.detail.d.empi;
        let buttonsToUpdate = document.querySelectorAll(`.swym-collections-social-count[data-product-id="${productId}"]`);
        buttonsToUpdate.forEach((buttonToIncrease) => {
          let updatedNumber = Number(buttonToIncrease.textContent) + 1;
          buttonToIncrease.textContent = updatedNumber;
        });
      });
    }
    // Step 6: Ensure the callback function is registered
    if (!window.SwymCallbacks) {
      window.SwymCallbacks = [];
    }
    window.SwymCallbacks.push(swymCallbackFn);
  })();
</script>
A step-by-step Explanation for reference:
- Collect Product IDs:
- Gather all the collection buttons with a common distinct class
swym-collections-social-counthas been used in the above example. - Extract and store their
data-product-idattribute values in an array.
- Gather all the collection buttons with a common distinct class
- Fetch Social Count:
- Define a function
fetchSocialCountthat takes a product ID and returns a promise. - This promise resolves with the social count data for the product.
- Define a function
- Generate Fetch Requests:
- Create an array of promises using the product IDs by mapping each ID to a call to
fetchSocialCount.
- Create an array of promises using the product IDs by mapping each ID to a call to
- Execute Fetch Requests:
- Use
Promise.allto execute all fetch requests simultaneously. - Update the corresponding buttons' text content with the retrieved social count.
- Ensure all buttons with the same product ID are updated.
- Use
- Update on Wishlist Addition:
- Add an event listener for the
addedToWishlistevent. - When a product is added to the wishlist, update the social count for all corresponding buttons.
- Add an event listener for the
How to Implement a Custom "Save for Later" Button on Your Cart Page
Follow these steps to add a custom "Save for Later" button to your cart page. This feature allows customers to save items for later purchase. Note that this implementation is functional only on the cart pages. Please note that the Save for Later functionality must be enabled on the Swym Admin for this implementation to function correctly.
Step 1: Add the button HTML
Add the following HTML code to your desired location on the cart page:
<swym-sfl-line-button>
  <button
    id="swym-custom-sfl-btn"
    class="swym-sfl-line-button link"
    type="button"
    data-variant-id="{{ item.variant.id }}" // Insert tag that fetches the variant ID
    data-product-id="{{ item.product_id }}" // Insert tag that fetches the product ID
    data-product-url="{{ shop.url }}{{ item.url }}" // Insert tag that fetches the variant URL
    data-quantity="{{ item.quantity }}" // Insert tag that fetches the count to Save for later
    style="<Insert your custom styling here>"
  >
    Save For Later
  </button>
</swym-sfl-line-button>
Step 2: Create and Add this Script to swym-custom.liquid
Create a file named swym-custom.liquid and add the following script:
<script>
(function() {
  function sflInit(swat) {
      swat.SaveForLater.init(
          sfl => {
              swat.sfl = sfl;
              swat.sflLid = sfl.listid;
              swat.SaveForLater.fetch(swat.sflLid, function(response){
                  swat.sfl.listcontents = response.items;
              }, err => console.error(err))
          },
          err => console.error(err)
      )
  }
  if (!window.SwymCallbacks) window.SwymCallbacks = [];
  window.SwymCallbacks.push(sflInit);
  class SwymSflLineButton extends HTMLElement {
      constructor() {
        super();
          this.button = this.querySelector('button');
          if(this.button) this.button.addEventListener('click', this._addToSFL.bind(this));
      }
      _addToSFL(evt){
        const product = [{
          'du': this.button.dataset.productUrl,
          'empi': this.button.dataset.productId,
          'epi': this.button.dataset.variantId,
          'qty': this.button.dataset.quantity
        }]
        const cartRemoveButton = this.button.closest('.cart-item').querySelector('cart-remove-button'); // Please modify these selectors according to your store
        _swat.SaveForLater.add(_swat.sflLid, product, res => console.log(res), err => console.error(err));
        cartRemoveButton.dispatchEvent(new CustomEvent('click'));
      }
    }
    customElements.define('swym-sfl-line-button', SwymSflLineButton);
})();
</script>
Step 3: Include the Script in theme.liquid
theme.liquidAdd the following line to your theme.liquid file to include the script you created in Step 2:
{ % include 'swym-custom' %}
By following these steps, you can successfully add a "Save for Later" button to your cart page. If you have any further queries regarding this implementation, please reach out to [email protected] and we’ll be more than happy to assist you!
Additional Information
Once the code and script have been added, please add the appropriate CSS for the appearance of the social count.
Integrating Product Object Data to Your Custom Wishlist Page
Introduction:
When merchants build custom Wishlist pages using our JavaScript APIs, they often want to display additional product data such as sale prices, compare-at prices, and other custom information. This data cannot be fetched using Shopify's default tags alone. This article provides a solution for integrating such product data into your custom Wishlist page.
Accessing Product Object Data:
Most of the time, the additional product information can be accessed by appending ".json" to the product URL, thereby retrieving the product object data. The following script can be included in your liquid file to fetch this data and make it available for use.
Script for Fetching Product Data:
Below is a script that fetches product data and allows you to access the necessary information from the response. The script includes a log for viewing all available product data in the console.
<script defer>
    // Executed after SWYM has loaded all necessary resources.
  (function() {
    function onSwymLoadCallback(swat) {
        swat.fetch(async (wishlist) => {
            let wishlistedProducts = await fetchProductData(wishlist);
            console.log("Wishlist items with product details:", wishlistedProducts);
            // Example to fetch "Availability status" for the first product in the array
            console.log(wishlistedProducts[0].productData.available);
        });

        async function fetchProductData(wishlist) {
            let fetchedProducts = await Promise.all(wishlist.map(async (listItem) => {
                let response = await fetch(listItem.du.split('?')[0] + '.js');
                let productData = await response.json();
                listItem.productData = productData;
                return listItem;
            }));
            return fetchedProducts;
        }
    }

    if (!window.SwymCallbacks) {
        window.SwymCallbacks = [];
    }
    window.SwymCallbacks.push(onSwymLoadCallback);
 })();
</script>
Sample Output of Product object data:
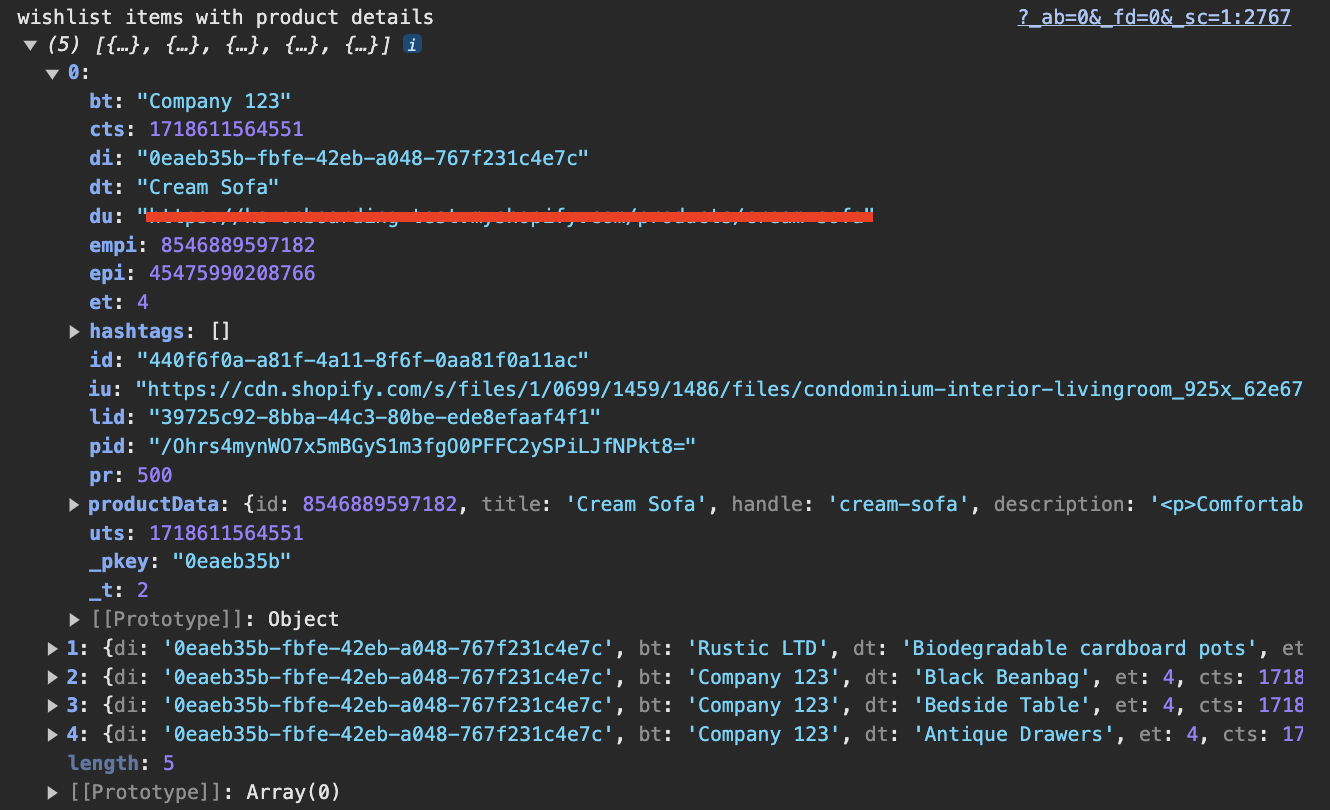
Product Object Data
By following these steps, you can effectively integrate additional product data into your custom Wishlist pages, providing a richer and more informative shopping experience for your customers.
How to Fetch ListID Using the Swym API
ListID Using the Swym APIIntroduction:
To dynamically obtain the list ID ("lid") for each user, you can utilize Swym's API to fetch the list IDs. This guide will walk you through using the Fetch Lists API call to retrieve all existing lists along with their corresponding IDs.
Step-by-Step Guide:
- Understanding the Fetch Lists API:
The Fetch Lists API allows you to retrieve all the lists created by a user along with their corresponding IDs. Detailed instructions on how to use this API can be found in the Fetch Lists API documentation.
- Adding the Script:
Insert the following script into your liquid file where you need to fetch the list IDs.
<script defer>
  function onSwymLoadCallback(swat) {
    // Define success callback
let onSuccess = function(lists) {
  // Successfully fetched all lists
  console.log("Fetched all Lists", lists);
}
// Define error callback
let onError = function(error) {
  // Error is an xhrObject
  console.log("Error while fetching all Lists", error);
}
// Call `fetchLists` function
swat.fetchLists({
  callbackFn: onSuccess,
  errorFn: onError
});
  }
  if (!window.SwymCallbacks) {
    window.SwymCallbacks = [];
  }
  window.SwymCallbacks.push(onSwymLoadCallback);
</script>
- Fetching the ListID:
The list IDs can be retrieved from the response of the fetchLists API call. The response will include a list of all the lists along with their IDs.
Example Response:
Here is an example of what the response looks like:
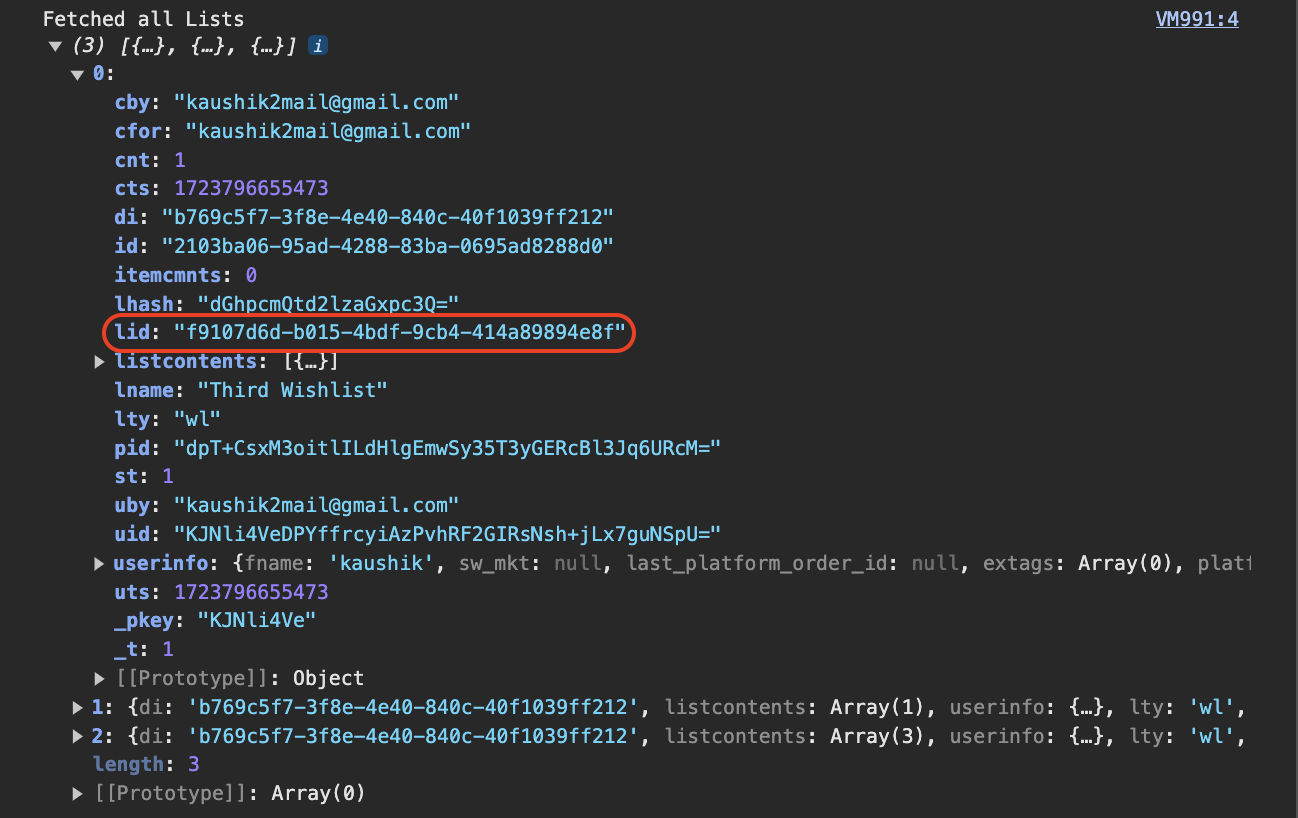
In the case of multiple Lists, you can run a for loop to fetch all the ListIDs within the Array.
By following these steps, you can dynamically obtain the list IDs for each user using Swym's Fetch Lists API. This enables you to manage and manipulate user lists efficiently and utilize the LIDs for various other API calls.
For more detailed information, please contact our support team for further assistance.
Updated 8 months ago